
This page will cover:
Members
Members is a setting in your site's dashboard that stores and displays all users. There are two types of members: Community Members and Site Users.
- Community Members are public users registered through the site's public interface. They visit your site to consume information and provide feedback.
- Site Users are internal users, such as Site Admins, Team Leads, Project Lead, and Project Authors. They have access to the system's back-end and can perform various tasks like adding new projects, editing content, adding engagement tools, viewing reports, and more. General Site Users can be assigned specific user roles (e.g., Project Lead or Project Author) that determine their project access and administrative permissions.

Adding new members
To add new members, you will need to navigate the Dashboard:
- From the Dashboard select 'Members'.
- Select 'Add User'.
- Select what kind of user you will be adding 'Site User' (Site admin, Team lead, Project Manager, or Project Authors) or 'Community Member.'
- Fill in the required details of the member. Once finished, click 'Add,' and the member should be added to the relevant list.
For a comprehensive overview of User Roles and Managing Users, visit this page. For quick reference, continue here.
User roles
There are four kinds of user roles people can be assigned to in Social Pinpoint.
Team Lead's have the ability within their project team to:
- Add/edit content
- View reports and feedback results
- Assign users roles to projects
- Publish live changes
- Receive workflow notifications
Project Lead's have the ability within their projects to:
- Add/edit content
- View reports and feedback results
- Publish live changes
Project Author's have the ability within their projects to:
- Add/edit content
- View reports and feedback results
- Any publications submitted by project authors are sent to a Team lead, Project Lead or Site Admin for review and approval.
Site admins have full control over their site. They can do all of the above and can add new users, launch projects, and publish content.
To assign someone with one of these User Roles, a Site Admin can go into the desired Project page's settings, scroll down to Permitted Users, find the username of a Site User, and select the appropriate User Role.
Social Pinpoint will provide you with your username and password to log into the site. If you have not received your log in details, please send an email to support@openpoint.com.
Launch a Project
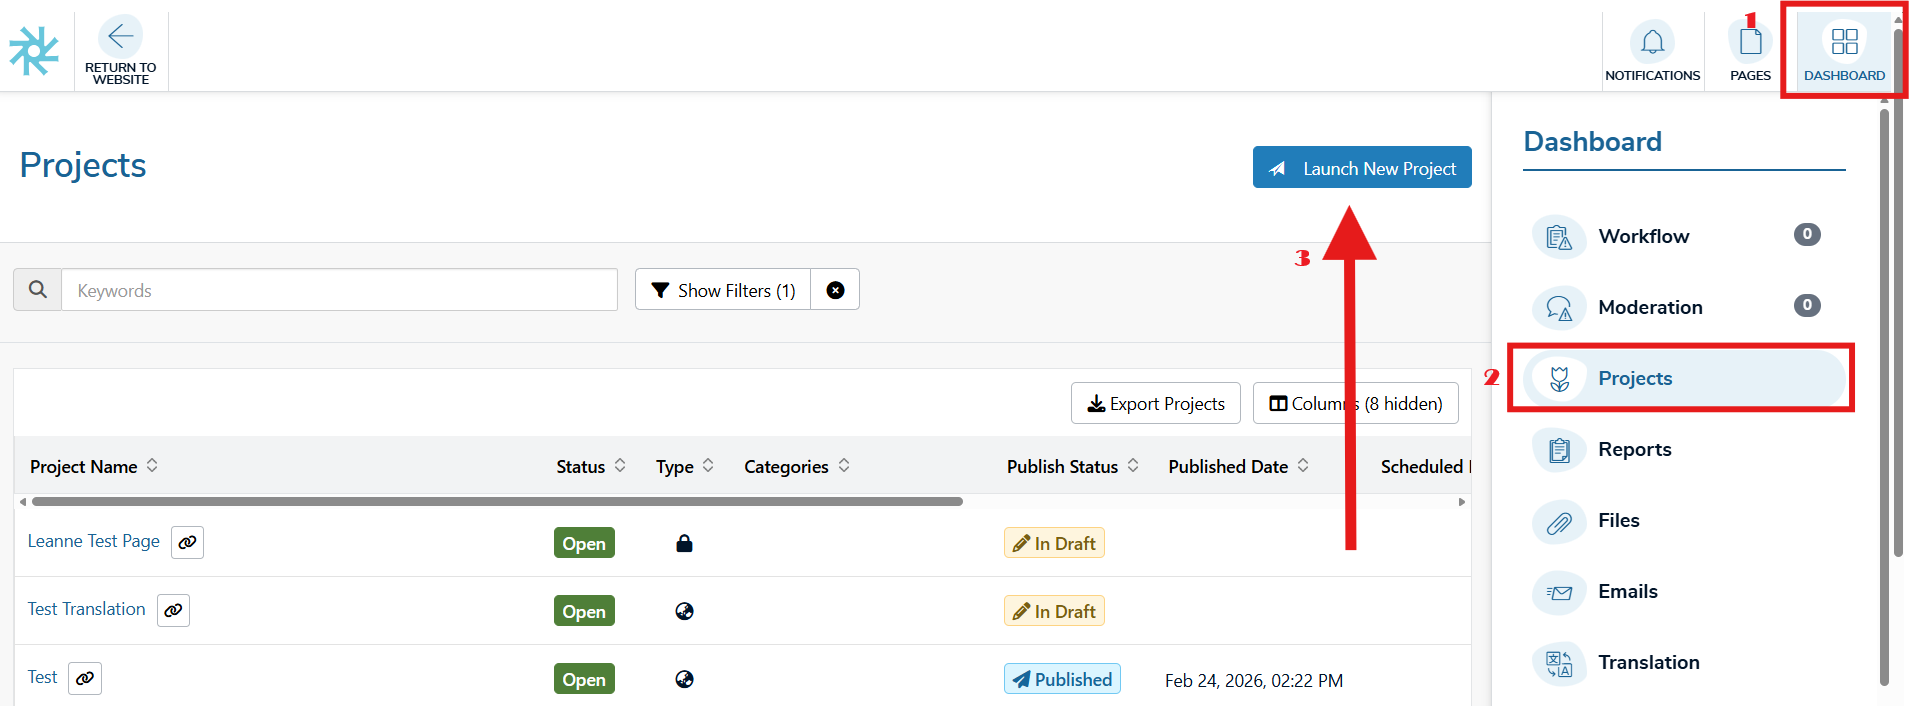
Only Site Admins can launch new projects. There are two ways you can do this:
- From the Dashboard > Projects > Launch a Project.
- From the toolbar select 'Pages' > under 'New Page' > Project Page.
Fill out the three pages of details of the project (project name, URL, etc.) and then click the Launch Project button. Once you have launched your project, it will take you to the draft project page where you can start editing and adding content.
Adding Content
- Click on the toolbox icon in the toolbar.
- Find the desired block and click (and hold) the icon.
- Drag the tool onto the site into a block area.
- Existing content on your site will highlight in green, and thicker green lines will show where your block will be placed.
Editing Content
- Click on the Edit button in the toolbar.
- Hover over the content you want to edit and left click on it.
- Select "Edit block" from the dropdown list that appears.
For more instructions on how to edit and add content, please view Add and edit content.
Saving and Publishing
- After finishing editing or adding content on your project page, click the Save icon in the toolbar.
- You will see three options:
- Save Changes: Saves the changes made to the current project page. These changes can be viewed by assigned users, but they will not be visible to the public until published.
- Submit to Workflow or Publish Changes: Publishes the changes to the public. If the button reads "Submit to workflow," the changes need approval before being published live. A notification will appear on the project page after selecting "Submit to workflow" to approve the page.
- Discard Draft or Discard Changes: The Discard Changes button deletes the draft project page and its content. It is available only when the project is in draft mode. The Discard Changes button appears after the page has been published and deletes the changes made since the last save or publish. Both the Discard Changes and Discard Draft buttons are not available for Project Authors.
✉️ Social Pinpoint Helpdesk
Social Pinpoint offers clients access to our Helpdesk which can be used to raise tickets to log any technical issues with your site. You can also and track our progress in resolving that issue.
How to Access the Helpdesk
Our HelpDesk can be found here: https://knowledge.socialpinpoint.com/portal While we prefer you to file it in the portal so you can track the tickets you've filed, you can also just send an email to support@openpoint.com
To access the Helpdesk portal, you must create an account if you do not already have one (please note that it is not the same as your site admin logins). To do this, select 'Register here.' on the bottom part of the screen. You will be asked to fill out the details. You must use your company email to sign up.
After signing up, you will receive an activation link to the email you provided. Follow the instructions in the email activate your account and create a password.
Raising Technical Issues
The Helpdesk can be used to log bugs or issues you have encountered while using your platform. Any technical questions or requests must be logged through the Tickets section. You will then be prompted to fill out some information about the issue you have encountered. We recommend providing as much detail, including screenshots of the issue so we can understand and resolve it faster. You will be able to track our progress by clicking on Check ticket status on the home page of the Helpdesk.
If your issue relates to content, you can use this learning centre for advice. If you need more help, you might want to get in touch with your Social Pinpoint Account Manager (CSM).
🛠️ Key Social Pinpoint tools and features
Engagement management
Using Social Pinpoint, you can quickly launch new project pages and manage the engagement process through a range of tools. The launch wizard makes it simple to add new projects to your portal, which can then be worked on in draft environments prior to being scheduled for launch.
In-page editing
The Social Pinpoint in-page editing features provide an intuitive editing experience that makes it easy to add and manage content on your engagement sites. Changes can be made directly in the page rather than through a clunky back-end, and the drag and drop interface makes it easy to add new content and arrange it on the project canvas.
Content management
An integrated File Manager assists you in expertly manage the content on The Social Pinpoint. Features include project folders to group content (including bulk file downloads), a replace function to update all instances of a particular file across your site all at once, bulk and built-in image editing tools that let you edit image content without an external application.
Reports
Social Pinpoint is always working on making reporting even easier and more insightful. The current Social Pinpoint reporting capabilities make it easy to view community feedback across the site and extract data for further analysis through a simple export.
Extensive analytics (including engagement – specific metrics) track the behaviour of your users along with the performance of the site, allowing you to measure success and identify opportunities for further engagement.
User roles and private projects
Social Pinpoint has a fine-grain level of user permissions, allowing for a variety of user roles to be implemented at the project level. For example, a single user may act as an ‘engagement’ manager on one project but plays a different role such as ‘author’ on another.
User roles can also be leveraged to create private projects, which are perfect for running consultations with internal or external stakeholders, community focus groups or citizen juries.
Privacy and security
Social Pinpoint is built on best practice security methods and has been vigorously tested to ensure your information is kept safe and secure.
Accessibility
We believe that everyone should be able to actively participate in shaping the communities around them, regardless of their physical abilities. All of our products are built using Responsive Web Design principles to meet WCAG 2.0 Level AA standards and ensure a functional experience across a range of browsers and devices.
Helpdesk and support
Social Pinpoint's online Helpdesk is available to our Clients 24 hours a day and is serviced during regular business hours. The Helpdesk provides access to our Knowledge Base, which includes documentation on how to use features, best practices, and troubleshooting. Clients are also able to log support tickets through the Helpdesk, which are responded to within the terms of Social Pinpoint's Service Level Agreements.